A Compelling Example
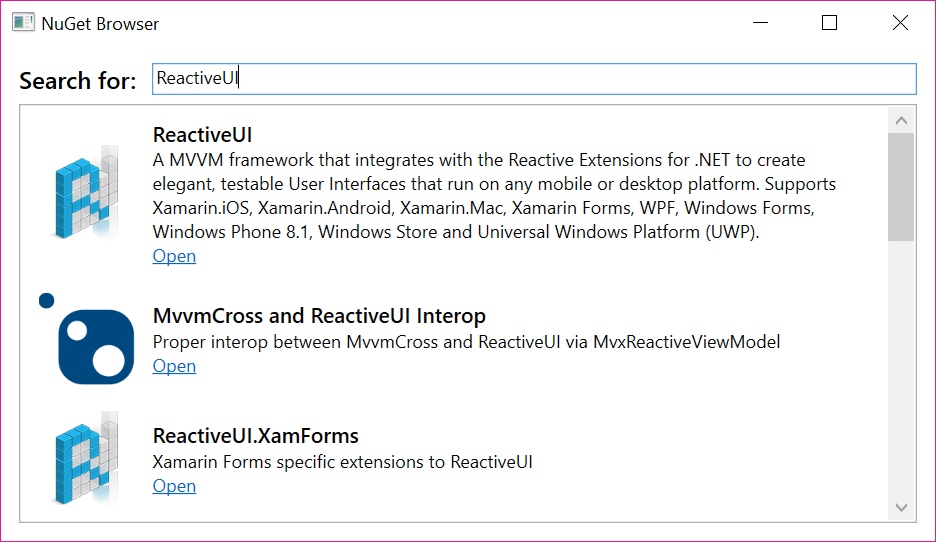
Let's create a simple application demonstrating a number of ReactiveUI functionalities, without getting into too many under-the-hood details. We will create a WPF application, which will allow us to search through NuGet public repositories. The full code of the application is shown at the end of this chapter, and we will show relevant snippets as we go.
1. Create the project
In Visual Studio, create a new WPF application (.NET 4.6.2 or above), use ReactiveDemo app name. Our view has been already created for us, the MainWindow, so we will proceed with creating our ViewModel.
2. Add NuGet packages
Install-Package ReactiveUI.WPF
The complete list containing NuGet packages for all supported platforms can be found here. ReactiveUI main package should normally be installed into you .NET Standard class libraries containing platform-agnostic code (repositories, services, DTOs, view-models), and ReactiveUI.XXX packages are platform-specific, so we use ReactiveUI.WPF in this tutorial as we are developing a tiny WPF application that doesn't need code sharing.
Install-Package NuGet.Protocol
We also need a NuGet client library in this tutorial, and we are going to install and use NuGet Client.
3. Create ViewModels
// AppViewModel is where we will describe the interaction of our application.
// We can describe the entire application in one class since it's very small now.
// Most ViewModels will derive off ReactiveObject, while most Model classes will
// most derive off INotifyPropertyChanged
public class AppViewModel : ReactiveObject
{
    // In ReactiveUI, this is the syntax to declare a read-write property
    // that will notify Observers, as well as WPF, that a property has
    // changed. If we declared this as a normal property, we couldn't tell
    // when it has changed!
    private string _searchTerm;
    public string SearchTerm
    {
        get => _searchTerm;
        set => this.RaiseAndSetIfChanged(ref _searchTerm, value);
    }

    // Here's the interesting part: In ReactiveUI, we can take IObservables
    // and "pipe" them to a Property - whenever the Observable yields a new
    // value, we will notify ReactiveObject that the property has changed.
    //
    // To do this, we have a class called ObservableAsPropertyHelper - this
    // class subscribes to an Observable and stores a copy of the latest value.
    // It also runs an action whenever the property changes, usually calling
    // ReactiveObject's RaisePropertyChanged.
    private readonly ObservableAsPropertyHelper<IEnumerable<NugetDetailsViewModel>> _searchResults;
    public IEnumerable<NugetDetailsViewModel> SearchResults => _searchResults.Value;

    // Here, we want to create a property to represent when the application
    // is performing a search (i.e. when to show the "spinner" control that
    // lets the user know that the app is busy). We also declare this property
    // to be the result of an Observable (i.e. its value is derived from
    // some other property)
    private readonly ObservableAsPropertyHelper<bool> _isAvailable;
    public bool IsAvailable => _isAvailable.Value;

    public AppViewModel()
    {
        // Creating our UI declaratively
        //
        // The Properties in this ViewModel are related to each other in different
        // ways - with other frameworks, it is difficult to describe each relation
        // succinctly; the code to implement "The UI spinner spins while the search
        // is live" usually ends up spread out over several event handlers.
        //
        // However, with ReactiveUI, we can describe how properties are related in a
        // very organized clear way. Let's describe the workflow of what the user does
        // in this application, in the order they do it.

        // We're going to take a Property and turn it into an Observable here - this
        // Observable will yield a value every time the Search term changes, which in
        // the XAML, is connected to the TextBox.
        //
        // We're going to use the Throttle operator to ignore changes that happen too
        // quickly, since we don't want to issue a search for each key pressed! We
        // then pull the Value of the change, then filter out changes that are identical,
        // as well as strings that are empty.
        //
        // We then do a SelectMany() which starts the task by converting Task<IEnumerable<T>>
        // into IObservable<IEnumerable<T>>. If subsequent requests are made, the
        // CancellationToken is called. We then ObserveOn the main thread,
        // everything up until this point has been running on a separate thread due
        // to the Throttle().
        //
        // We then use an ObservableAsPropertyHelper, OAPH, and the ToProperty() method to allow
        // us to have the latest results that we can expose through the property to the View.
        _searchResults = this
            .WhenAnyValue(x => x.SearchTerm)
            .Throttle(TimeSpan.FromMilliseconds(800))
            .Select(term => term?.Trim())
            .DistinctUntilChanged()
            .Where(term => !string.IsNullOrWhiteSpace(term))
            .SelectMany(SearchNuGetPackages)
            .ObserveOn(RxSchedulers.MainThreadScheduler)
            .ToProperty(this, x => x.SearchResults);

        // We subscribe to the "ThrownExceptions" property of our OAPH, where ReactiveUI
        // marshals any exceptions that are thrown in SearchNuGetPackages method.
        // See the "Error Handling" section for more information about this.
        _searchResults.ThrownExceptions.Subscribe(error => { /* Handle errors here */ });

        // A helper method we can use for Visibility or Spinners to show if results are available.
        // We get the latest value of the SearchResults and make sure it's not null.
        _isAvailable = this
            .WhenAnyValue(x => x.SearchResults)
            .Select(searchResults => searchResults != null)
            .ToProperty(this, x => x.IsAvailable);
    }

    // Here we search NuGet packages using the NuGet.Client library. Ideally, we should
    // extract such code into a separate service, say, INuGetSearchService, but let's
    // try to avoid overcomplicating things at this time.
    private async Task<IEnumerable<NugetDetailsViewModel>> SearchNuGetPackages(
        string term, CancellationToken token)
    {
        var providers = new List<Lazy<INuGetResourceProvider>>();
        providers.AddRange(Repository.Provider.GetCoreV3()); // Add v3 API support
        var packageSource = new PackageSource("https://api.nuget.org/v3/index.json");
        var source = new SourceRepository(packageSource, providers);
        ILogger logger = NullLogger.Instance;

        var filter = new SearchFilter(false);
        var resource = await source.GetResourceAsync<PackageSearchResource>().ConfigureAwait(false);
        var metadata = await resource.SearchAsync(term, filter, 0, 10, logger, token).ConfigureAwait(false);
        return metadata.Select(x => new NugetDetailsViewModel(x));
    }
}
The goal of the ReactiveUI syntax for read-write properties is to notify Observers that a property has changed. Otherwise we would not be able to know when it was changed.
In cases when we don't need to provide for two-way binding between the View and the ViewModel, we can use one of many ReactiveUI Helpers, to notify Observers of a changing read-only value in the ViewModel. We use the ObservableAsPropertyHelper twice, once to turn a generic IEnumerable
This also works in the opposite direction, when we take the SearchTerm property and turn it into an observable. This means that we are notified every time a change occurs in the UI. Using Reactive Extensions, we then throttle those events, and ensure that the search occurs no sooner than 800ms after the last keystroke. And if at that point the user did not change the last value, or if the search term is blank, we ignore the event completely. We have another ObservableAsPropertyHelper property IsAvailable which is generated by determining if our current SearchResults is null.
Let's now create a NugetDetailsViewModel.cs class that will wrap our NuGet metadata into a more usable class for our View. It includes a ReactiveCommand for opening the NuGet Repository URL.
// This class wraps our NuGet model object into a ViewModel and allows
// us to have a ReactiveCommand to open the NuGet package URL.
public class NugetDetailsViewModel : ReactiveObject
{
    private readonly IPackageSearchMetadata _metadata;
    private readonly Uri _defaultUrl;

    public NugetDetailsViewModel(IPackageSearchMetadata metadata)
    {
        _metadata = metadata;
        _defaultUrl = new Uri("https://git.io/fAlfh");
        OpenPage = ReactiveCommand.Create(() =>
        {
            Process.Start(new ProcessStartInfo(this.ProjectUrl.ToString())
            {
                UseShellExecute = true
            });
        });
    }

    public Uri IconUrl => _metadata.IconUrl ?? _defaultUrl;
    public string Description => _metadata.Description;
    public Uri ProjectUrl => _metadata.ProjectUrl;
    public string Title => _metadata.Title;

    // ReactiveCommand allows us to execute logic without exposing any of the
    // implementation details with the View. The generic parameters are the
    // input into the command and its output. In our case we don't have any
    // input or output so we use Unit which in Reactive speak means a void type.
    public ReactiveCommand<Unit, Unit> OpenPage { get; }
}
4. Create Views
ReactiveUI allows you to create views using two different approaches. The recommended approach is using type-safe ReactiveUI bindings that can save you from memory leaks and runtime errors. The second approach is using XAML markup bindings.
Create Views using ReactiveUI type-safe bindings (recommended)
First, we need to register our views in the App.xaml.cs file.
public partial class App
{
    public App()
    {
        // A helper method that will register all classes that derive off IViewFor
        // into our dependency injection container. ReactiveUI uses Splat for it's
        // dependency injection by default, but you can override this if you like.
        AppLocator.CurrentMutable.RegisterViewsForViewModels(Assembly.GetCallingAssembly());
    }
}
Then we declare the XAML for our Main Window.
<reactiveui:ReactiveWindow
    x:Class="ReactiveDemo.MainWindow"
    x:TypeArguments="reactivedemo:AppViewModel"
    xmlns="http://schemas.microsoft.com/winfx/2006/xaml/presentation"
    xmlns:x="http://schemas.microsoft.com/winfx/2006/xaml"
    xmlns:d="http://schemas.microsoft.com/expression/blend/2008"
    xmlns:mc="http://schemas.openxmlformats.org/markup-compatibility/2006"
    xmlns:reactivedemo="clr-namespace:ReactiveDemo"
    xmlns:reactiveui="http://reactiveui.net"
    Title="NuGet Browser" Height="450" Width="800"
    mc:Ignorable="d">
    <Grid Margin="12">
        <Grid.ColumnDefinitions>
            <ColumnDefinition Width="Auto" />
            <ColumnDefinition Width="*" />
        </Grid.ColumnDefinitions>
        <Grid.RowDefinitions>
            <RowDefinition Height="Auto" />
            <RowDefinition Height="*" />
        </Grid.RowDefinitions>
        <TextBlock FontSize="16" FontWeight="SemiBold"
                   VerticalAlignment="Center" Text="Search for: "/>
        <TextBox Grid.Column="1" Margin="6 0 0 0" x:Name="searchTextBox" />
        <ListBox x:Name="searchResultsListBox" Grid.ColumnSpan="3"
                 Grid.Row="1" Margin="0,6,0,0" HorizontalContentAlignment="Stretch"
                 ScrollViewer.HorizontalScrollBarVisibility="Disabled" />
    </Grid>
</reactiveui:ReactiveWindow>
We need to derive the MainWindow from IViewFor<T>, so we use ReactiveWindow<TViewModel> base class.
Note If there is no reactive base class for your view control that can suite you, simply implement the IViewFor
interface by hand. Remember to store the ViewModel in a DependencyProperty or in a BindableProperty. See Data Binding for platform-specific examples.
We are going to use ReactiveUI Binding to bind our ViewModel to our View. Reactive binding is a cross platform way of consistently binding properties on your ViewModel to controls on your View. The ReactiveUI binding has a few advantages over the XAML based binding. The first advantage is that property name changes will generate a compile error rather than runtime errors.
// MainWindow class derives off ReactiveWindow which implements the IViewFor<TViewModel>
// interface using a WPF DependencyProperty. We need this to use WhenActivated extension
// method that helps us handling View and ViewModel activation and deactivation.
public partial class MainWindow
{
    public MainWindow()
    {
        InitializeComponent();
        ViewModel = new AppViewModel();

        // We create our bindings here. These are the code behind bindings which allow
        // type safety. The bindings will only become active when the Window is being shown.
        // We register our subscription in our disposableRegistration, this will cause
        // the binding subscription to become inactive when the Window is closed.
        // The disposableRegistration is a CompositeDisposable which is a container of
        // other Disposables. We use the DisposeWith() extension method which simply adds
        // the subscription disposable to the CompositeDisposable.
        this.WhenActivated(disposableRegistration =>
        {
            // Notice we don't have to provide a converter, on WPF a global converter is
            // registered which knows how to convert a boolean into visibility.
            this.OneWayBind(ViewModel,
                viewModel => viewModel.IsAvailable,
                view => view.searchResultsListBox.Visibility)
                .DisposeWith(disposableRegistration);

            this.OneWayBind(ViewModel,
                viewModel => viewModel.SearchResults,
                view => view.searchResultsListBox.ItemsSource)
                .DisposeWith(disposableRegistration);

            this.Bind(ViewModel,
                viewModel => viewModel.SearchTerm,
                view => view.searchTextBox.Text)
                .DisposeWith(disposableRegistration);
        });
    }
}
Reactive Binding allows you to modify the ViewModel property by using Binding Converters. These Binding Converters are able to be registered globally or they can be declared locally. We are going to use Binding Converters in two instances, firstly we have a global converter registered by default on XAML projects that converts a boolean to Visibility, and the second to convert our project URL into a BitmapImage locally one.
We are now going to create a view for our NugetDetailsViewModel. Create a new UserControl named NugetDetailsView and change it's XAML to the following:
<reactiveui:ReactiveUserControl
  x:Class="ReactiveDemo.NugetDetailsView"
  xmlns:reactiveDemo="clr-namespace:ReactiveDemo"
  x:TypeArguments="reactiveDemo:NugetDetailsViewModel"
  xmlns:reactiveui="http://reactiveui.net"
  xmlns="http://schemas.microsoft.com/winfx/2006/xaml/presentation"
  xmlns:x="http://schemas.microsoft.com/winfx/2006/xaml">
  <Grid>
      <Grid.ColumnDefinitions>
          <ColumnDefinition Width="Auto" />
          <ColumnDefinition Width="*" />
      </Grid.ColumnDefinitions>
      <Image x:Name="iconImage" Margin="6" Width="64" Height="64"
             HorizontalAlignment="Center" VerticalAlignment="Center"/>
      <TextBlock Grid.Column="1" TextWrapping="WrapWithOverflow"
                 Margin="6" VerticalAlignment="Center">
          <Run FontSize="14" FontWeight="SemiBold" x:Name="titleRun"/>
          <LineBreak />
          <Run FontSize="12" x:Name="descriptionRun"/>
          <LineBreak />
          <Hyperlink x:Name="openButton">Open</Hyperlink>
      </TextBlock>
  </Grid>
</reactiveui:ReactiveUserControl>
Then edit code-behind of the NugetDetailsView.
// The class derives off ReactiveUserControl which contains the ViewModel property.
// In our MainWindow when we register the ListBox with the collection of
// NugetDetailsViewModels if no ItemTemplate has been declared it will search for
// a class derived off IViewFor<NugetDetailsViewModel> and show that for the item.
public partial class NugetDetailsView
{
    public NugetDetailsView()
    {
        InitializeComponent();
        this.WhenActivated(disposableRegistration =>
        {
            // Our 4th parameter we convert from Url into a BitmapImage.
            // This is an easy way of doing value conversion using ReactiveUI binding.
            this.OneWayBind(ViewModel,
                viewModel => viewModel.IconUrl,
                view => view.iconImage.Source,
                url => url == null ? null : new BitmapImage(url))
                .DisposeWith(disposableRegistration);

            this.OneWayBind(ViewModel,
                viewModel => viewModel.Title,
                view => view.titleRun.Text)
                .DisposeWith(disposableRegistration);

            this.OneWayBind(ViewModel,
                viewModel => viewModel.Description,
                view => view.descriptionRun.Text)
                .DisposeWith(disposableRegistration);

            this.BindCommand(ViewModel,
                viewModel => viewModel.OpenPage,
                view => view.openButton)
                .DisposeWith(disposableRegistration);
        });
    }
}
This view will automatically get displayed in the ListBox in the MainWindow. When using Reactive Binding on XAML platforms, if no ItemTemplate has been set, it will look for a IViewFor<T> inside our Dependency Injection and display the Item using that control. Notice we convert our URI above into a BitmapImage just for the OneWayBind. ReactiveUI allows us to quickly convert types which is much easier syntax than the XAML Value Converters.
Now you can search repositories on NuGet using your own app!
Create Views using traditional XAML markup bindings
If you would like to use XAML bindings (remember, they don't guarantee type-safety and don't provide tools for memory management, such as WhenActivated, but ReactiveUI bindings do), then this tutorial is for you.
The first thing you need to do is creating a converter, while we have a boolean property AppViewModel.IsAvailable indicating if our ViewModel has content loaded. Let's create a new class BoolToVisibilityConverter.cs.
// If we would like to do value conversion using Binding markup extension,
// we need to implement the IValueConverter interface.
public class BoolToVisibilityConverter : IValueConverter
{
    public object Convert(object value, Type targetType, object parameter, CultureInfo culture)
    {
        // We need to convert True value to Visibility.Visible and False value to
        // Visibility.Collapsed. Then we need to declare the converter as a static resource.
        return (bool)value ? Visibility.Visible : Visibility.Collapsed;
    }

    public object ConvertBack(object value, Type targetType, object parameter, CultureInfo culture)
    {
        // Our app doesn't need to be able to convert values back, so we won't implement this.
        return Binding.DoNothing;
    }
}
Now we should initialize the DataContext of our MainWindow by assigning an instance of the AppViewModel to it. Go to MainWindow.xaml.cs and do this:
public partial class MainWindow
{
    public MainWindow()
    {
        InitializeComponent();
        DataContext = new AppViewModel();
    }
}
Finally, we need to create XAML markup for our app.
<Window x:Class="ReactiveDemo.MainWindow"
        xmlns="http://schemas.microsoft.com/winfx/2006/xaml/presentation"
        xmlns:x="http://schemas.microsoft.com/winfx/2006/xaml"
        xmlns:d="http://schemas.microsoft.com/expression/blend/2008"
        xmlns:mc="http://schemas.openxmlformats.org/markup-compatibility/2006"
        Title="NuGet Browser" mc:Ignorable="d" Height="450" Width="800">
    <Window.Resources>
        <ResourceDictionary>
            <!--
            Here we declare the value converter that we've implemented
            on the previous step. We will need it later to convert the
            IsAvailable boolean property to Visibility.
            -->
            <BooleanToVisibilityConverter x:Key="BoolToVisible" />
        </ResourceDictionary>
    </Window.Resources>
    <Grid Margin="12">
        <Grid.ColumnDefinitions>
            <ColumnDefinition Width="Auto" />
            <ColumnDefinition Width="*" />
        </Grid.ColumnDefinitions>
        <Grid.RowDefinitions>
            <RowDefinition Height="Auto" />
            <RowDefinition Height="*" />
        </Grid.RowDefinitions>
        <TextBlock FontSize="16"
                   FontWeight="SemiBold"
                   VerticalAlignment="Center"
                   Text="Search for: "/>
        <!--
        Here we create a two-way binding for the SearchTerm property
        of our ViewModel. When a user types something into the TextBox,
        value of the SearchTerm property will be updated automatically.
        Don't forget to set UpdateSourceTrigger to PropertyChanged on
        WPF and UWP platforms.
        -->
        <TextBox Grid.Column="1"
                 Margin="6 0 0 0"
                 Text="{Binding SearchTerm,
                                Mode=TwoWay,
                                UpdateSourceTrigger=PropertyChanged}"/>
        <!--
        Here we bind the IsAvailable property to ListView's Visibility
        using the value converter we've declared above. Also, we bind
        SearchResults list to ListView's ItemsSource.
        -->
        <ListBox Grid.ColumnSpan="3"
                 Grid.Row="1" Margin="0,6,0,0"
                 ItemsSource="{Binding SearchResults}"
                 HorizontalContentAlignment="Stretch"
                 ScrollViewer.HorizontalScrollBarVisibility="Disabled"
                 Visibility="{Binding IsAvailable,
                                      Mode=OneWay,
                                      Converter={StaticResource BoolToVisible}}">
            <ListBox.ItemTemplate>
                <DataTemplate>
                    <Grid>
                        <Grid.ColumnDefinitions>
                            <ColumnDefinition Width="Auto" />
                            <ColumnDefinition Width="*" />
                        </Grid.ColumnDefinitions>
                        <Image Margin="6" Width="64" Height="64"
                               Source="{Binding IconUrl, Mode=OneWay}"
                               HorizontalAlignment="Center"
                               VerticalAlignment="Center"/>
                        <TextBlock Grid.Column="1" Margin="6"
                                   TextWrapping="WrapWithOverflow"
                                   VerticalAlignment="Center">
                            <Run FontSize="14" FontWeight="SemiBold"
                                 Text="{Binding Title, Mode=OneWay}"/>
                            <LineBreak />
                            <Run FontSize="12" Text="{Binding Description, Mode=OneWay}"/>
                            <LineBreak />
                            <Hyperlink Command="{Binding OpenPage}">Open</Hyperlink>
                        </TextBlock>
                    </Grid>
                </DataTemplate>
            </ListBox.ItemTemplate>
        </ListBox>
    </Grid>
</Window>
Now you can search repositories on NuGet using your own app!
Source code of the application described in this guide can be found on GitHub.